Showing posts with label Inspire us. Show all posts

Saturday, November 27, 2010

Blog hop for November!


Welcome to Lovebug Scrapbooking's "INSPIRE US!" blog hop!! Our blog hops take place on the last Saturday of every month. Thanks so much for joining us!

If you just happened by this blog and didn't realize a blog hop was taking place, please go back to Lovebug Scrapbooking and start the Hop. You won't want to miss all the inspiration from our members....... or the prizes :-)


Our theme for November is CHRISTMAS!!

I wanted so share some of my cards with you. I have not done much card-making at all, but this month I decided to try my hand at some. Who knows, I MAY even get these Christmas cards out in the mail this year! LOL!


~~~~~~~~~~~~~~~~~~~~

This blog hop will run from today, November 27th until November 29th.
We will be drawing for winners on November 30th on the Lovebug Scrapbooking blog.

You're at the end of the hop. Head back to Lovebug Scrapbooking!!

Saturday, October 23, 2010

INSPIRE US!! Blog Hop at Lovebug Scrapbooking!


Welcome to Lovebug Scrapbooking's "INSPIRE US!" blog hop!! Our blog hops NORMALLY take place on the last Saturday of every month. This month we decided to go a week earlier, so you could get some Halloween inspiration before the holiday :-) Thanks so much for joining us!

If you just happened by this blog and didn't realize a blog hop was taking place, please go back to Lovebug Scrapbooking and start the Hop. You won't want to miss all the inspiration from our members....... or the prizes :-)

Our theme for this month is HALLOWEEN.


As a family, we don't celebrate Halloween, but I had a friend ask me to make some treat bags for her. These little bags take little time to make, and I must say, with the new Bo Bunny
"Whoo-Ligans Monsters" paper, they look kinda cute :-)


Very easy to make! I picked up a package of small paper bags at Wal-Mart. On this sheet of pp, there are 12 little "monsters" so you can finish 12 treat bags. I also used some raffia-type ribbon and some orange ribbon. Add in a couple of buttons and you're done!

I matted the monster card on some orange paper first, and distressed and inked the edges.


Here's the finished product!


This blog hop will run from today, October 23rd until October 25th. We will be drawing for a winner on October 26th on the Lovebug blog.
In addition, I will be drawing for a copy of Scrapbooking & Beyond - Fall 2010 issue -- from all the comments on my blog :-)

Follow along in our blog hop! Your next stop is Tanya S.

Saturday, September 25, 2010

Thanksgiving

Welcome to Lovebug Scrapbooking's "INSPIRE US!" blog hop!! Our blog hops
take place on the last Saturday of every month. Thanks so much for joining
us!

If you just happened by this blog and didn't realize a blog hop was taking
place, please go back to Lovebug Scrapbooking and start the Hop. You won't
want to miss all the inspiration from our members :-)

Our theme for September is "THANKSGIVING".

I love Thanksgiving :-) We normally spend the day together as a family. We cook a big turkey dinner. Sometimes we'll go on a hike, to get out and enjoy the nice fall weather.

Today I thought I'd share some Thanksgiving quotes -- these are so inspiring and would be great on a scrapbook layout or card.

~ Remember God's bounty in the year. String the pearls of His favor. Hide the dark parts, except so far as they are breaking out in light! Give this one day to thanks, to joy, to gratitude! Henry Ward Beecher

~ Thanksgiving, after all, is a word of action. W.J. Cameron

~ For flowers that bloom about our feet;
For tender grass, so fresh, so sweet;
For song of bird, and hum of bee;
For all things fair we hear or see,
Father in heaven, we thank Thee!
Ralph Waldo Emerson

~ A thankful heart is not only the greatest virtue, but the parent of all the other virtues. Cicero

~ Nothing is more honorable than a grateful heart. Seneca

~ We can only be said to be alive in those moments when our hearts are conscious of our treasures. Thornton Wilder

~ So once in every year we throng
Upon a day apart,
To praise the Lord with feast and song
In thankfulness of heart.
Arthur Guiterman

~ Not what we say about our blessings, but how we use them, is the true measure of our thanksgiving. W.T. Purkiser

~ If the only prayer you said in your whole life was, "thank you," that would suffice. Meister Eckhart

This blog hop will run from today, September 25th until Tuesday, September 28th. We will be drawing for winners on September 29th on the Lovebug blog.

Now, HOP over to Tania's blog!


May your stuffing be tasty
May your turkey plump,
May your potatoes and gravy
Have nary a lump.
May your yams be delicious
And your pies take the prize,
And may your Thanksgiving dinner
Stay off your thighs!
~Author Unknown

Saturday, August 28, 2010

Back to School


Welcome to Lovebug Scrapbooking's "INSPIRE US!" blog hop!! Our blog hops
take place on the last Saturday of every month. Thanks so much for joining
us!

If you just happened by this blog and didn't realize a blog hop was taking
place, please go back to Lovebug Scrapbooking and start the Hop. You won't
want to miss all the inspiration from our members....... or the prizes :-)

Our theme for August is "BACK TO SCHOOL".

~~~~~~~~~~~~~~~~~~

For my project I made a thank-you card for a teacher. I like how the apple turned out :-) I just tore 3 pieces of red cardstock, kinda in the shape of an apple, and added a couple of torn leaves.

My youngest son thinks the "TU" should have been "TY" but ty doesn't come together in the alphabet :-) Hopefully, the TU will be understood as a thank you.

...and the inside:


~~~~~~~~~~~~~~~~~~~~~


This blog hop will run from today, August 28th until August 31st. We will be
drawing for winners on September 1st on the Lovebug blog

You're at the end of the HOP! Head on back to Lovebug Scrapbooking.

Saturday, July 31, 2010

Happy Birthday banner


Welcome to Lovebug Scrapbooking's "INSPIRE US!" blog hop!! Our blog hops
take place on the last Saturday of every month. Thanks so much for joining
us!

If you just happened by this blog and didn't realize a blog hop was taking
place, please go back to Lovebug Scrapbooking and start the Hop. You won't
want to miss all the inspiration from our members....... or the prizes :-)

Our theme for July is "HAPPY BIRTHDAY".

~~~~~~~~~~~~~~

For my project this month, I decided to make a Birthday banner and I will share the tutorial with you here.
I started by making a template (3 1/2 X 4 1/2 inches) I made a mark at 1 3/4 and drew a triangle shape.


Cut out as many triangles as there are letters (for my project, I did my name).

I wanted a scalloped edge on my triangles, so I used my border punch and made some scalloped pieces. I adhered them with glue.


Here's how I got the rounded edge at the point of the triangle:
step 1: Adhere one scalloped piece along one edge.


Step 2: Trim the edge as shown.
Step 3: Adhere second piece, aligning them and making sure 2 halves of a scallop are matching up.
Step 4: Using your scissors, trim the second scalloped piece.
Using various supplies, embellish your triangles. Adhere to a strip of ribbon.


I added some Prima flowers on the ends of my banner. Oh, and I used Lovebug's JUNE kit!


Hope you enjoyed this tutorial!

Leave a comment and I'll put you name in for a bag of RIBBON! I'll draw for the prize on August 4th.


~~~~~~~~~~~~~~~


This blog hop will run from today, July 31st until August 3rd. We will be
drawing for winners on August 4th on the Lovebug blog.

You are now at the end of our blog hop! Head back to Lovebug Scrapbooking!


Saturday, June 26, 2010

And the bride wore WHITE......

Welcome to Lovebug Scrapbooking's "INSPIRE US!" blog hop!! Our blog hops
take place on the last Saturday of every month. Thanks so much for joining
us!

If you just happened by this blog and didn't realize a blog hop was taking
place, please go back to Lovebug Scrapbooking and start the Hop. You won't
want to miss all the ispiration from our members....... or the prizes :-)

Our theme for June is "Here Comes the Bride".

~~~~~~~~~~~~~~~


I wanted to challenge you to create an "all-white" layout or card. You may add in a small amount of one other color, but that's it! It can be one you've created previously, or a new one -- I know how busy things can be at this time of year :-)

Post a link here in the comments.

Here is one I created over a year ago.


For a prize, I am offering up an all-white package :-) I found a few other white items that are not shown in this picture. There's cardstock, acrylic appliques, ribbon, bling, Thickers and more!


~~~~~~~~~~~~~~~


This blog hop will run from today, June 26th until June 29th. We will be drawing for winners on June 30th on the Lovebug Blog. Be sure to check back and see if you're a WINNER!

Follow along in our blog hop! Your next stop is LOIS!


Saturday, May 29, 2010

"INSPIRE US!" -- Graduation

Welcome to Lovebug Scrapbooking's "INSPIRE US!" blog hop!! Our blog hops take place on the last Saturday of every month. Thanks so much for joining us!

If you just happened by this blog and didn't realize a blog hop was taking place, please go back to Lovebug Scrapbooking and start the Hop. You won't want to miss all the inspiration from our members....... or the prizes :-)

Our theme for May is "Graduation".

~*~*~*~*~*~*~*~

Just yesterday I had my son in to get his graduation pictures done. Since we are homeschooling our children, they won't get to take part in the public school graduation. Luke didn't mind that at all, but I did want him to get his cap/gown pictures done. Did he ever look handsome! I don't have a pic to share with you yet, but I will post when I get them. We are planning a graduation ceremony some time in June.

We are so proud of our boy, or I should say -- young man! He has so much potential and so much to look forward to.

Anyway, on to my project!
You'll need a 8.5x11 sheet of cardstock. Score and fold in half length-wise and width-wise.
Cut out the bottom left corner. NOTE: Flip your cardstock over so the wrong side is on top before cutting. I did my sample the wrong way.
Flip the bottom flap up. Cut a slit at the top, as shown. I think there are punches to do this, but I don;t have one :-) I used my exacto knife.

Using some sticky tape, adhere the flap down.


Add your greeting. I cut a small rectangle to go inside the flap. I'll insert a gift certificate or some money in there.


Decorate the front of your card.

~*~*~*~*~*~*~*~


This blog hop will run from today, May 29th until June 1st. Lovebug will be drawing for winners on June 2nd .


I also have a prize to give away. If you follow my blog, I'll put your name in for a CD by my youngest sister. It's called "On The Right Track".


You are at the end of the blog hop!
Head back to Lovebug Scrapbooking and leave a comment :-)

Wednesday, April 28, 2010

Winner of my.....

ribbon RAK for the Lovebug blog hop is RACHEL (mymommymoments). Congrats!! I'll get that sent out this week :-)

Saturday, April 24, 2010

Lovebug's "Inspire Us!" Blog Hop


Welcome to Lovebug Scrapbooking's "INSPIRE US!" blog hop!! Our blog hops take place on the last Saturday of every month. Thanks so much for joining us!

If you just happened by this blog and didn't realize a blog hop was taking place, please go back to Lovebug Scrapbooking and start the Hop. You won't want to miss all the inspiration from our members....... or the prizes :-)

Our theme for April is "Mother's Day/Father's Day". Time to honor our mothers and fathers!

~~~~~~~~~~~~~~
For my project, I enlisted the help of my daughter :-) I just KNEW she'd want to make something for me for Mother's Day! She decided on a mini album in which she will write some things about me and herself, and will probably add some photos (I'm not allowed to see that part until Mother's Day!)
Okay.....start with a sheet of patterned paper 12x12 inches. A thicker paper would work best. Score it at 5 3/4 and 11 3/4 inches. Fold.


Apply sticky tape along the small edge, and adhere. You'll have something like a flattened tube.

Score at 6 inches and fold in half. This is the basis for your mini album.

Cut a piece of contrasting paper 3 x 5 3/4 inches. You can scallop the edges for a nicer look :-) Score and fold in half. Adhere to album edge, as shown.

Punch two holes in the binding. Add eyelets and tie with ribbon.


There are two paper inserts that can be written on or decorated. The size is 5 1/2 x 6 inches. These can be scalloped on the edge OR you can add a tab.

Decorate front of album as desired.


For this project, we used the new "Sophie" line by Bo Bunny.


Here are some other ideas for children to make for Mother's Day:
Mother's Day Crafts
Enchanted Learning - Mother's Day
Today's Parent - Crafts & Fun
DLTK's Mother's Day Activities

~~~~~~~~~~~~~~

This blog hop will run from today, April 24th until April 27th. Lovebug will be drawing for winners on April 28th
I will also draw for a ribbon RAK on my blog. Leave a comment!

Head back to Lovebug Scrapbooking and let them know you finished the Hop!

Saturday, March 27, 2010

Bunny Treat Holder - "Inspire Us!"


Welcome to Lovebug Scrapbooking's "INSPIRE US!" blog hop!! Our blog hops
take place on the last Saturday of every month. Thanks so much for joining
us!

If you just happened by this blog and didn't realize a blog hop was taking
place, please go back to Lovebug Scrapbooking and start the Hop. You won't
want to miss all the inspiration from our members....... or the prizes :-)

Our theme for March is "EASTER".

~~~~~~~~~~~~~~~~~~~~~~~~~~~~~~~~~~~~


For my Easter project, I made a Bunny Treat Holder. I had this saved on my computer for some time now, but I don't know what site I saved it from.

These would be very easy for children to make, and also would be great for teachers to give out to students.

INSTRUCTIONS:
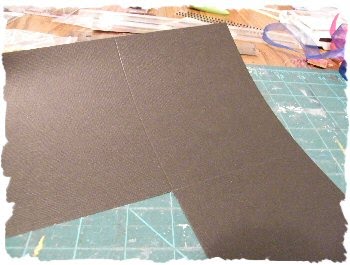
I started with a piece of white cardstock, 4x6 inches. Score in half length-wise. Make a light mark at the center of each end, and draw a line from the ends to the scored rectangle (as shown). Score and fold these lines. Punch 4 holes as shown.


Draw and cut out bunny ears and feet. For the feet, I traced around a Memento ink. Add ink to make his paw prints. For the ear shapes, leave a little tab so you can stick them on the triangle shape. I used ink to add some detail.


You need about 12-14 inches of ribbon to tie the treat box together. Thread the ribbon as shown. In the top left hole, the ribbon goes from the outside, in ...... then across to the top right hole from inside, out :-) Center the ribbon, then thread each end in the bottom holes (from the inside, out). Believe me -- I tried a number of different combinations before coming up with one that worked!


(Note: this one has the front holes too close to the center point. It didn't draw together well)

Draw face on your bunny. This should be done before threading the ribbon :-) I added some ink for the cheeks.


Don't forget the treats! Draw ribbon together and fold box up. Tie into bow.
Adhere feet and ears as shown.


Thanks for looking at my Easter project! Leave a comment sharing something you do at Easter time. I'll draw a winner on the 31st for a scrappy RAK!

If you become a follower of my blog, you won't miss out on the announcement (wink!)


~~~~~~~~~~~~~~~~~~~~~~~~~~~~~~~~~~~~


This blog hop will run from today, March 27th until March 30th. We will be drawing for winners on March 31st.

You are at the END of the Hop. Head back to Lovebug Scrapbooking to finish up!

Saturday, February 27, 2010

Spring card - "INSPIRE US!" Blog Hop

Welcome to Lovebug Scrapbooking's "INSPIRE US!" blog hop!! Our blog hops take place on the last Saturday of every month. Thanks so much for joining in the fun!

If you just happened by this blog and didn't realize a blog hop was taking place, please go back to Lovebug Scrapbooking and start the Hop. You won't want to miss all the inspiration from our members....... or the prizes :-)

Our theme for February is "Leaps and Bounds".

~~~~~~~~~~~~~~~~~~~~~~~~~~~~~~~

For my "spring-y" project, I decided to make a card.

Step 1:
Cut cardstock 7 x 11 inches. Score at 5 1/2 inches and fold in half.


Step 2:
On the inside left side of the card, lightly mark the center. Attach diecut sticker in center.


Step 3:
Using exacto knife, carefully cut around the right-hand part of the diecut, leaving a small cardstock edge. Don't cut past the center line.


Step 4:
Score along the line you drew down the center, and fold card back as shown.


Step 5:
Finish decorating your card.

Hope you enjoyed this little tutorial :-)

~~~~~~~~~~~~~~~~~~~~~~~~~~~~~~~

The Lovebug Blog Hop will run from today, February 27th until March 2nd. There will be a prize drawing on March 3rd.

You've reached the end our blog hop! Head back to Lovebug Scrapbooking blog to leave your comment and be entered in the prize drawing.